
Instruction Manual of 1ton electric floor crane (Foldable Shop Crane)
Keyword:Foldable Shop Crane Time:2020-12-9 20:28:52
Instruction Manual
Foldable Shop Crane
Notice: The operator must read this carefully and understand all the information in this manual before operating.
1,Summary
Shop crane: Stablely and easily operating. Small space to store. Widely used in workshop and garage to load/unload cargos.
2,Specification
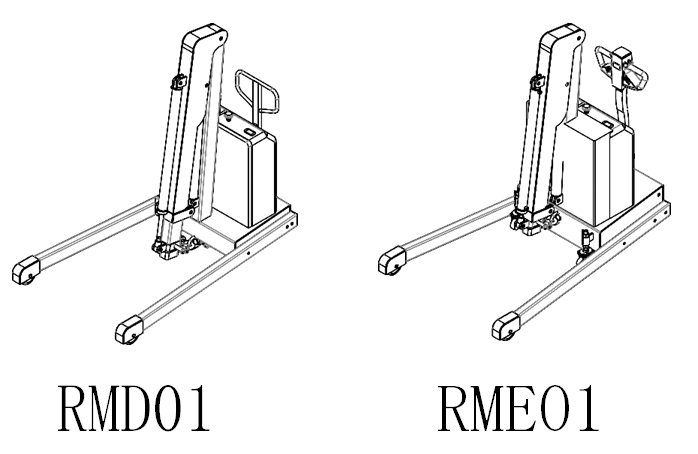
Name | Semi-Electric | Full Electric |
Model | RMD01 | RME01 |
Net Weight | 466KG | 568KG |
Electric Extension: Hydraulic control lifting and lowering
Electric Telescoping: Hydraulic control Telescoping. Manual telescoping fore-end arm with pin.
Counter-balance Rate: Adjust the crane to avoid any tip-over
3,Installation
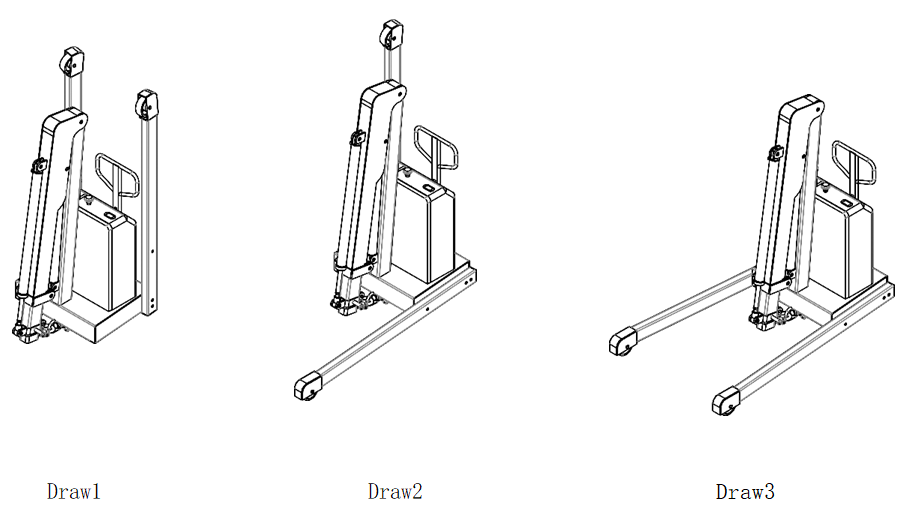
1,RMD01
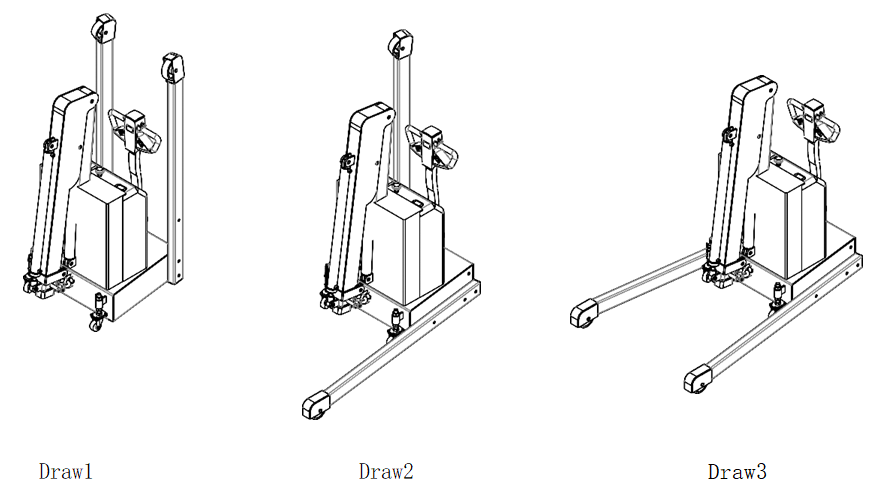
2,RME01
4,Assembly
1)Turn on to extend the arm. Hit ground to lift the chassis(Draw1).
2)Put down the leg and fix on the chassis with screws(Draw2).
3)Tilt to another side and fix the second leg as well(Draw3).
4)When folding the legs as process back.
5,Instruction
1)Check the battery before using. Forbid to operate when charging or shortage.
2)Press down the emergency switch when necessary, turn on to operate. Electric Extension˖ Press control rod(close the emergency switch) to expand the crane, loose it to stop. Push control rod to shrink.
Electric telescoping˖ Press control rod(right side) to telescope the arm of crane, loose it to stop. Push control rod to extend, loose to stop.
Operation˖ This crane is designed for hard ground. Lifting and moving objects should be slow and should not lift higher 50mm.The driving distance
should be as short as possible. The cargo should be removed after operation and it is not allowed to stay on the crane for a long time.
3)The crane should work and pack in place avoiding rain and snow, should not be used in a humid environment. It is strictly forbidden to work and stay on a slope.
4)Charging˖ Smart charging is a small charger that uses modern PWM switching technology to charge the battery. The charger has the characteristics of small size, light weight and high efficiency. The battery is charged by constant current and constant voltage (the battery life is not affected by overcharging), and the voltage and current are automatically adjustable. As the charging time goes by, the voltage at battery terminal gradually rised and the charging current gradually decreases, which is beneficial to prolong the service life of battery.
6,How to charge
1)Before using the charger, the output of the charger must be correctly connected to the battery, that is output positive(red wire) is connected to the positive of battery, and the output negative(black wire) is connected to the negative battery. Wrong connect will damage the equipment.
2)First plug the charger output plug into the battery socket. At this time, turn on the indicator and display the green light, then plug the input power into the power socket. This is power indicator light is red, the charging indicator light is yellow, and the fan is working, start charging. When fully charged, the fan automatically stops, the light turn green.
3)Finish Charging˖ When charging is finished, should unplug the power cord firstly and disconnect the charger and battery socket.
4)If the red indicator light does not illuminate during charging start or charging process, the charger is not working, please check the power supply and power fuse.
Charging Indicator light(yellow)˖ Normal charging status. Charging Indicator light(green)˖ Full Charging
Protection Indicator light(red)˖ Lighting: Temperature protection,
Flashing: Battery disconnect Power Indicator light(red)˖ Lighting: Connect well.
Dark: Power wire disconnect or fuse damaged.
Connect Indicator light(green)˖ Lighting: connect well with battery.
Notice: Power supply AC180V-250V. Prohibited to use out this range.
7,Charging Precautions
1)Output of charger and the positive and negative poles of the battery must not be connect incorrectly.
2)Only be used to charge the battery.
3)Keep away from the water.
4)Charging indicator light LED1 show yellow, cooling fan start to work and light turn to green it stops. Please do not use it when cooling fan is not working.
5)When power indicator light LED4 not light, please check the fuse.
6)Input fuse should use correct specification.
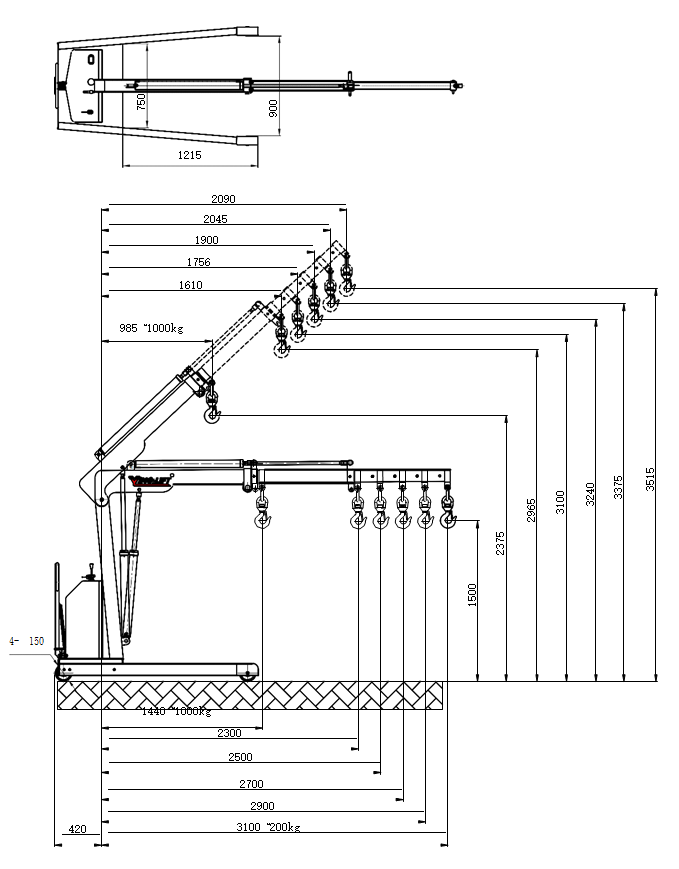
8,Dimensions˖
1,RMD01
2,RME01
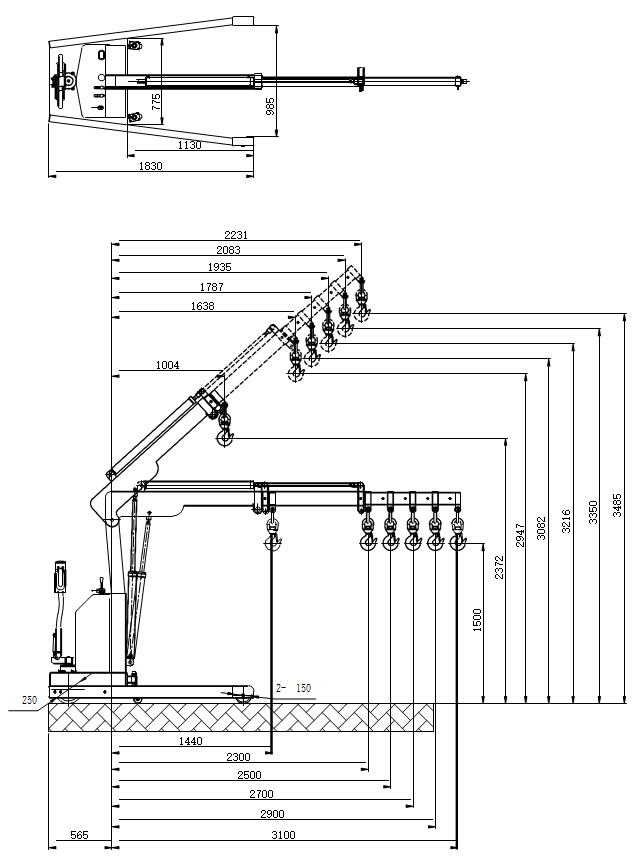
RME01 Loading Curve
RME01 | Unit | A | B | C | D | E | F | |
0 degree | Length | mm | 1440 | 2300 | 2500 | 2700 | 2900 | 3100 |
Rated Load | kg | 1000 | 342 | 290 | 250 | 220 | 200 | |
40 degree | Length | mm | 1004 | 1638 | 1787 | 1935 | 2083 | 2231 |
Rated Load | kg | 1100 | 565 | 430 | 345 | 290 | 250 | |
Inner size of legs | mm | 985 | ||||||
Outer size of legs | mm | 1170 | ||||||
Net Weight | kg | 568 | ||||||
9,Warranty
1)The user shall comply with the principle of use and maintenance, within 12 months from the date of shipping, the using date should not exceed 6 months. Due to the adverse effects of manufacturing, the company will provide free maintenance.
2)Failure caused by human factors such as eccentric overload and illegal operation is not covered by our warranty policy.
3)The wearing parts are in the daily maintenance of the user and are not covered by this warranty policy.
4)The company's products are provided repair service under any circumstance, only charge for maintenance costs.
10,Acceptance
1)Please check the package is good and has complete accessories.
2)If there is damage, please check the list and contact transportation.
3)After customer receipt, there will be not any responsibility to any party.
4)Any problem could contact the factory or supplier.
Note:1)Reading carefully before using.
2)The products should be repaired by professional technicians under the guidance of the factory. Please do not disassemble and modify it.
| DOWNLOADS |
|


